Aspire: Simplifying Microservices Development and Testing in .NET
Microservices and cloud-native solutions have become a common pattern in application development, but they often make local development more challenging. How can we test these applications effectively?
Aspire is Microsoft’s attempt to solve this problem for the .NET ecosystem. In short, it’s a framework that lets you orchestrate and wire up different services programmatically, with built in monitoring and management tools. It was made after frustration with the “time to F5” problem — which is how long it takes for a new developer to set up the project so they can run this locally. With many distributed apps this can be an extremely annoying process, and by wiring up through aspire, the hope is that it can be done much quicker.
To try it out, let’s build a simple application using Aspire!
To start, you will need the .NET 9 SDK and a container engine. Docker and Podman will both work.
When creating a solution using the starting Aspire template, you will see a project called AppHost and a project called ServiceDefaults. We’ll look at the AppHost project first. This is the project that will host all the various services that you run, and is in charge of starting them, wiring them together and managing them during the runtime. Let’s create an app with a postgres server and a redis server.
Aspire has what is called “hosting integrations”. These are packages that you can use to add various services to the hosting environment. We’ll start by adding these:
dotnet install Aspire.Hosting.Redis
dotnet install Aspire.Hosting.PostgreSQL
Now we can write the Program.cs class:
var builder = DistributedApplication.CreateBuilder(args);
var postgres = builder
  .AddPostgres(“postgres”)
  .WithDataVolume() // Stores data in a volume to persist data between runs
  .WithPgWeb(); // Simple web ui to manage database

var postgresdb = postgres.AddDatabase(“postgresdb”);
var redisCacheServer = builder.AddRedis(“redis”)
  .WithRedisCommander(); // Simple web ui to view and manage redis resource

builder.Build().Run();
Running this opens the following window in your browser:
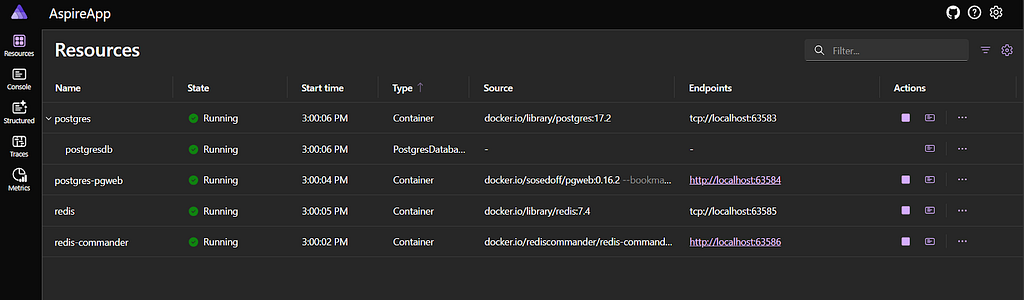
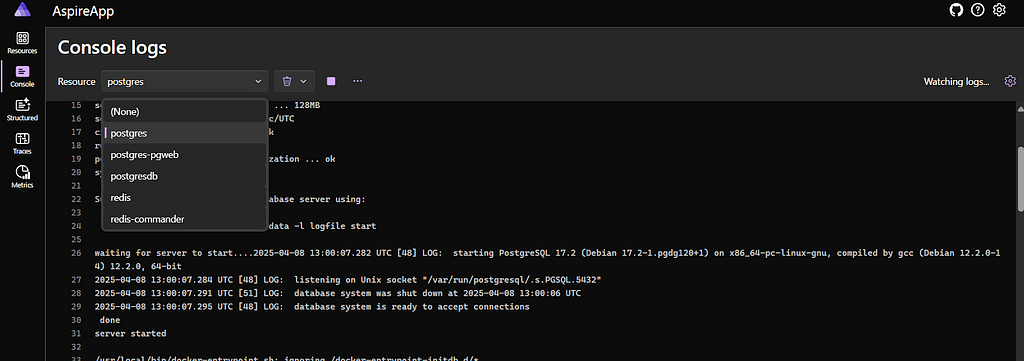
This management view allows you to see all resources created by the AppHost project. As you can see, it’s created four containers, which are automatically downloaded and run in the background if you have a container engine. This view allows you to to see the status of all the resources, as well as logs from each resource:
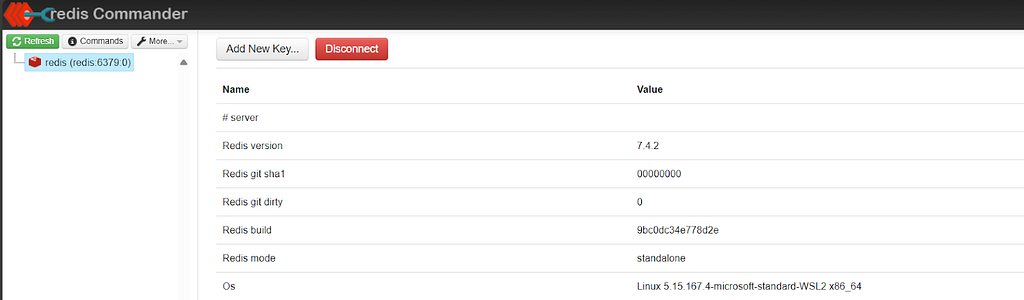
It has also hooked up connection strings for the management dashboards, so the redis-commander service has access to the redis database that was set up:
This is a good example of the value of Aspire, with just a few lines of code you can spin up these services and websites from a single project, and have complete oversight of their connections and statuses!
But it doesn’t just work with containers. It also lets you hook up projects as well. So let’s add a .NET website!
To do this, I’m going to set up a new project using the Blazor template. The Program.cs class will be mostly unchanged except for these:
builder.AddServiceDefaults();
builder.AddRedisDistributedCache(connectionName: “redis”);
builder.AddNpgsqlDbContext<TodoDbContext>(connectionName: “postgresdb”);
The first line here uses a new method from the ServiceDefaults project. This is a project that was added by the Aspire creators that contains default values that they believe should be used by any Asp.Net core apps. It configures OpenTelemetry, which gives detailed information about the app and requests it makes to downstream resources. It also sets up healthchecks, which can be used by the Aspire monitoring tool to check the health of the application. Additionally, it enables service discovery, which allows the app to find configuration values by using a given string called “connectionName”. This feature is used immediately afterwards, where we pass in the names that we gave to the resources in the AppHost project to get references to them.
The two remaining lines are methods from Aspire client integrations. These are different from Aspire hosting integrations, as instead of creating any resources they simply allow you to add services connected to those resources in an easy way. Here we are using the packages:
Aspire.Npgsql.EntityFrameworkCore.PostgreSQL

Aspire.StackExchange.Redis.DistributedCaching
These allow you to pass in a connectionName and automatically register the IDistributedCache and DbContext services for the Asp.Net application that will connect to the containers created by the AppHost.
Using these services, I created a simple To Do application. I then hooked it up to the AppHost project:
using Projects;

var builder = DistributedApplication.CreateBuilder(args);

var postgres = builder
  .AddPostgres(“postgres”)
  .WithDataVolume() // Stores data in a volume to persist data between runs
  .WithPgWeb(); // Simple web ui to manage database

var postgresdb = postgres.AddDatabase(“postgresdb”);
var redisCacheServer = builder.AddRedis(“redis”)
  .WithRedisCommander(); // Simple web ui to view and manage redis resource

var app = builder
  .AddProject<AspireApp_WebApp>(“webapp”)
  .WithReference(postgresdb) // Adds connection information for the postgres server to the app
  .WithReference(redisCacheServer)
  .WaitFor(postgres) // Do not start running until the postgres server is healthy
  .WaitFor(redisCacheServer); // Same for redis

builder.Build().Run();
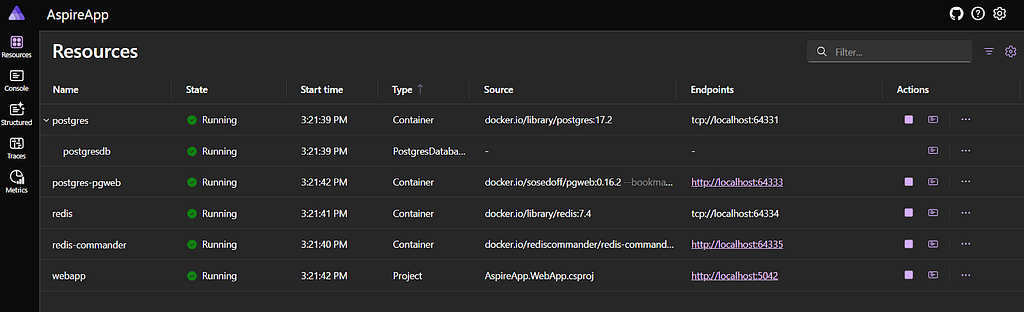
If you’re wondering where the AspireApp_WebApp class came from, it automatically gets added to the AppHost project if you create a reference to the WebApp project. Now when we run AppHost we get the following:
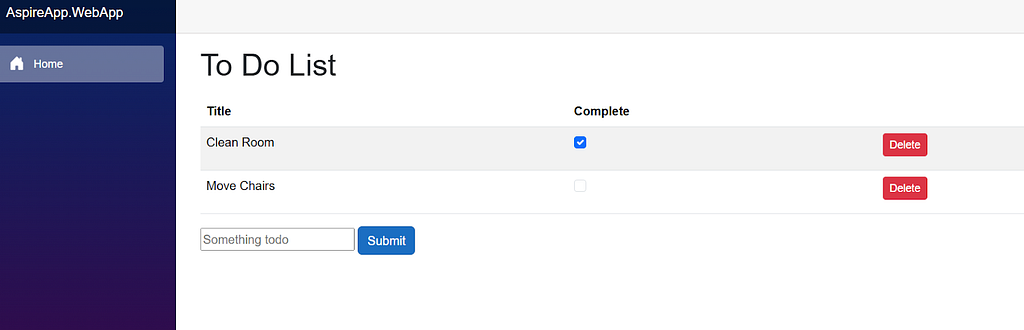
Going to the link gives us a very basic todo app:
After messing around with the app for a while, you can see another advantage of Aspire. Because we set up OpenTelemetry, we get dependency tracing for calls made to the website:

These traces let us see not only the calls to the web app but also trace them to the stores as it retrieves information.
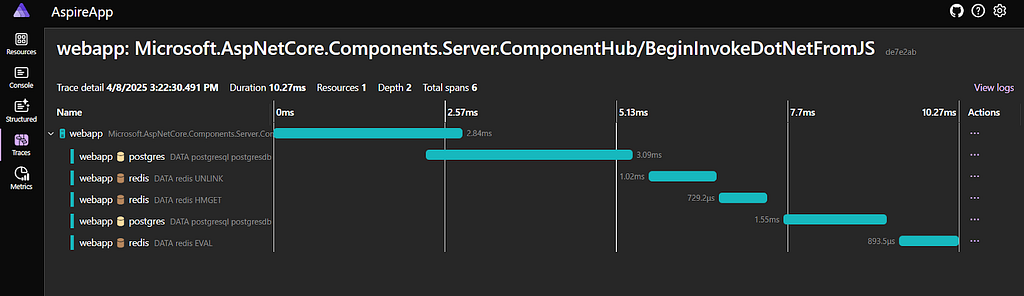
And even see the database call that was made:

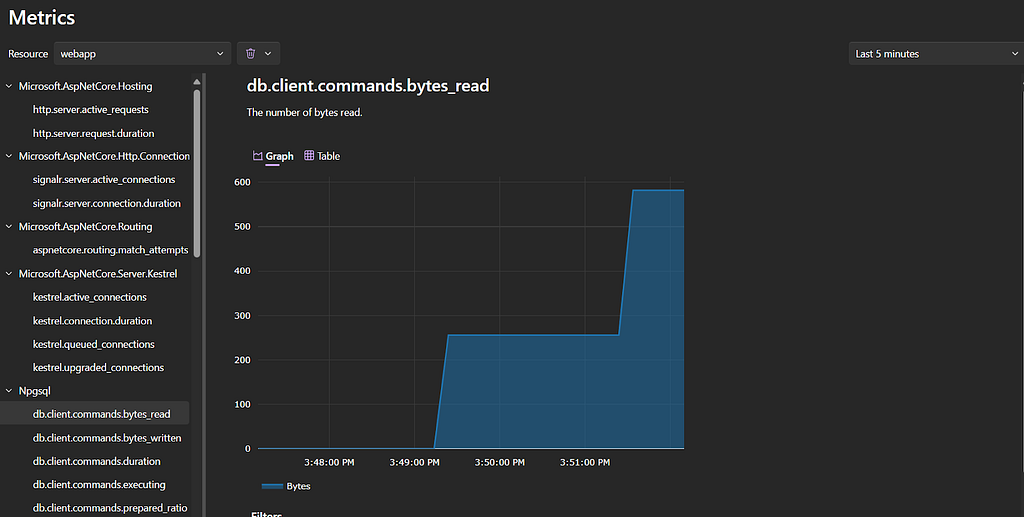
The web app also exposes live metrics about the application that can be viewed through the management screen:
And there you go! Very quickly, I’ve been able to set up a distributed application with monitoring, tracing and management tools. This application can also be debugged just like a normal .NET application, and IDEs like Rider and Visual Studio integrate with rider to provide integrations with their ecosystems.
There’s a lot more things you can do with Aspire, including
- End-to-end testing using the Aspire framework
- The ability to integrate any container, not just ones that have a package
- Container lifetimes, which lets you have containers that are not torn down on shutdown
- Automated deployment to cloud environments directly from Aspire
If you’re building a new .NET project that needs distributed components, I would highly recommend checking it out! At least in my experience, the “F5 problem” is a very real issue with these applications, and Aspire can go a long way towards solving it.
You can check out the full code used for this post here!
Now it is your turn to Aspire to greatness!
Aspire: Simplifying Microservices Development and Testing in .NET was originally published in Compendium on Medium, where people are continuing the conversation by highlighting and responding to this story.


